

Thursday, December 9, 2010
Monday, November 29, 2010


Tuesday, November 23, 2010
Thanksgiving Tree Art

I love Thanksgiving. It's a close tie with Christmas for my favorite holiday. I love that it begins the season that can get so caught up in commercialism, gimme-gimme, and gluttony with thankfulness, family, giving, and reflection and it's our goal to continue that attitude in our home into the Christmas holiday as well.
Every year at this time, we sit down as a family and make a record of the things we are especially thankful for. It's amazing how much God has done for us each year and fun to share those memories together. Last year, we wrote each item on a link to make a paper chain that we hung in our home for several months as a great tangible reminder of those blessings (including the one baking in my belly in that photo! :)...).

This year I wanted to make something similar, but something we could save and reuse each year that would be a special holiday piece for our family. We all brainstormed and decided to make a Thanksgiving tree. So this morning, my little Bug and I sat down to start creating our tree art.
I found a 12x18" piece of plywood in the basement to use and raided my scrapbook paper file to find some pretty paper to create the scene. I used a sparkly star paper for the sky and a textured white paper for the snow. Then I cut out 5 triangles ascending in size.


I didn't want it to be perfectly triangular, so I cut various angles and layered it so it still looked balanced and worked on gluing from the bottom up. And then we topped it off with a shiny, gold star.


After everything is set in place, I brushed a thin coat of the mod-podge (I use the clear matte kind) all over the entire picture. This seals down the edges and gives the paper a layer of protection. Once the first top layer is dry, I put another thin coat over the whole thing again, making sure to seal every edge and smooth out any air bubbles, which can be pretty tricky -- this photo is before the top layer, but on the last photo you can see mine is very imperfect, but I'm okay with that ;).
 The next step is to cut out ornaments that we will use to write out our items we are thankful for to hang on our Thanksgiving tree. I cut out 15 so we can each share 3 things for the tree (we'll have to help out the little Gummi Bear this year, hehehe). The plan is to laminate the ornaments so we can write on them and then erase and reuse them each year. I may even embellish them each a little after they are laminated with a little silvery bow or something. Then they will just stick on the tree with a little piece of tape. I'm looking forward to filling our tree full of blessings this weekend so we can have this pretty and fun reminder displayed this month for us to remember and share.

Happy Thanksgiving!
P.S. My blog totally needs a makeover I know! I was hoping to get to it by now, but looks like it will be a bit...sorry for the blah look in the meantime! I will beautify it soon. ;) Does anyone even read this anyways? hahaha!

Every year at this time, we sit down as a family and make a record of the things we are especially thankful for. It's amazing how much God has done for us each year and fun to share those memories together. Last year, we wrote each item on a link to make a paper chain that we hung in our home for several months as a great tangible reminder of those blessings (including the one baking in my belly in that photo! :)...).
This year I wanted to make something similar, but something we could save and reuse each year that would be a special holiday piece for our family. We all brainstormed and decided to make a Thanksgiving tree. So this morning, my little Bug and I sat down to start creating our tree art.
I found a 12x18" piece of plywood in the basement to use and raided my scrapbook paper file to find some pretty paper to create the scene. I used a sparkly star paper for the sky and a textured white paper for the snow. Then I cut out 5 triangles ascending in size.
I didn't want it to be perfectly triangular, so I cut various angles and layered it so it still looked balanced and worked on gluing from the bottom up. And then we topped it off with a shiny, gold star.
Little Bug helped with the gluing. We painted a light coat of Mod-Podge on the back of each piece to secure it to the plywood and paper.
I also found some word art stickers that were perfect to place underneath the tree, and spelled out "thanksgiving" at the bottom - I was shocked I had enough of each letter left! (I haven't scrapbooked in 5 years!)
After everything is set in place, I brushed a thin coat of the mod-podge (I use the clear matte kind) all over the entire picture. This seals down the edges and gives the paper a layer of protection. Once the first top layer is dry, I put another thin coat over the whole thing again, making sure to seal every edge and smooth out any air bubbles, which can be pretty tricky -- this photo is before the top layer, but on the last photo you can see mine is very imperfect, but I'm okay with that ;).
The next step is to cut out ornaments that we will use to write out our items we are thankful for to hang on our Thanksgiving tree. I cut out 15 so we can each share 3 things for the tree (we'll have to help out the little Gummi Bear this year, hehehe). The plan is to laminate the ornaments so we can write on them and then erase and reuse them each year. I may even embellish them each a little after they are laminated with a little silvery bow or something. Then they will just stick on the tree with a little piece of tape. I'm looking forward to filling our tree full of blessings this weekend so we can have this pretty and fun reminder displayed this month for us to remember and share.Happy Thanksgiving!
P.S. My blog totally needs a makeover I know! I was hoping to get to it by now, but looks like it will be a bit...sorry for the blah look in the meantime! I will beautify it soon. ;) Does anyone even read this anyways? hahaha!
Friday, November 19, 2010
2010 Christmas Designs
My 2010 Holiday Card Designs are now available! Here is the new selection, but you can view the entire design collection over at the Color Me {Happy} Designs blog by clicking here.

My Cup of Teal:

Purple Wish:

Peppermint:

Cheer:

My Cup of Teal:

Purple Wish:

Peppermint:

Wonderful:

Wednesday, November 3, 2010
Rainbow Layer Cake
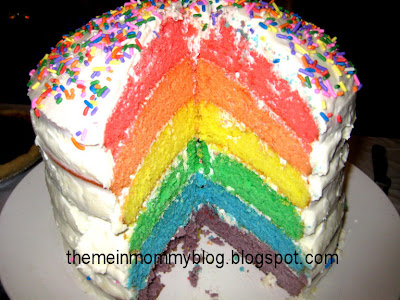
I had so much fun celebrating my 30th birthday this week with so many of my awesome family and friends. One of the highlights of the costume party (at least for me) was the rainbow cake! Plus it coordinated perfectly with my rainbow brite costume ;).

This is a cake that will definitely get some oohs and ahhs when you cut into it :). And I have had SO many people ask how to make it. Of course, you can find Martha Stewart's version here and several other great versions out there, but here are the steps I used to get the perfect 6 layer rainbow cake!

1. Take 2 white cake mixes and follow the instructions on the box to make the cake mix. (If you shop at Aldi's by the way, their cake mixes are by far the moistest mixes I have ever tried. I always use the cake mix from there because it's my favorite, and I don't even like cake that much!)


3. Pour the batter into 9" round baking pans. I had two of them, so I baked 2 layers at a time and then transferred them to cooling racks. Just be sure to grease and flour the pans well each time so the cakes don't stick! I baked them at 350 degrees F for about 14-15 min each. They will be lightly browned and a toothpick will come out clean in the center.
4. While the layers are baking, you can make the frosting (unless you're using it out of a can...). I used the following frosting recipe: Mix 2 sticks of room temp salted butter in mixer until smooth. Add 1 tsp vanilla and slowly add 4 cups of confectioner's sugar. Add 2 tsp milk. If you want it smoother, add another tsp of milk. Fold in 1 tub whipped topping (Cool Whip).
5. When all your layers have cooled, start with the purple layer and add a thin layer of frosting to the top. Stack the blue on top of the purple and continue adding a thin layer of frosting to each colored cake. After all the layers are stacked, put the cake in the freezer for an hour to set.

6. After the layers have set, remove from the freezer and ice the cake all over. I wished I had a little more frosting to go around, but I made due with what I had. If you want to "clean up" the frosting a bit, you can rinse the frosting spreader in hot water and smooth it out. I added rainbow sprinkles to the top, but you could also leave it white, or add a rainbow of skittles and marshmallows for a cloud on top! Put the cake back in the freezer for another hour.


7. Take the cake out of the freezer and store in the fridge until ready to serve!


It is such a happy cake! Happy to make, happy to look at, and happy to eat! You could totally have fun with the colored layers for different occasions too! Enjoy!
Tuesday, November 2, 2010
Inspiration Board: Boys' Room
I have been having so much fun putting together ideas for an upcoming house project. I promised my oldest son, who is 5 and very into dinosaurs, that when his baby brother gets big enough for a big boy bed we can work on creating a cool dinosaur room for the two of them. Now there is still a bit of time before we actually put it together (I'm thinking late spring, early summer), but with Christmas coming up, and lots of stuff I've been eyeing going on sales and clearance racks, I've decided to start putting together a plan and picking up things here and there.
My goals for the room are to make it bright, fun, and colorful -- without being too cartoony and babyish. I want something they can grow into. And keep it crisp and neat looking even though I want to throw in a few bright colors and patterns. I am thinking about painting the dark trim in their room white. It's about the last room in the house where the trim hasn't been painted and I think it's a big reason why the room currently feels so dark. And I'm thinking a white beadboard bottom with a rich, chocolate brown on the top half of the walls. I love the dinosaur mural I added to the inspiration below and I plan on incorporating something similar into the room. I love how it ties the browns, oranges, crisp whites, blues, and greens together!

I haven't been able to find any boy comforters I like. The only one that came close was from Kohls and it isn't available anywhere anymore. Of course. And I don't want to pay those outrageous prices for bedding to get something I like so-so. So, I decided to make it myself for a low price.
I found this great site called The Company Store that has all kinds of fun bedding on clearance. I ordered a blue striped sheet and a green striped sheet with a solid orange and a solid brown that I will use for the backings and I am going to sew the boys each a duvet cover. I purchased an Ikea duvet insert for about 12 bucks each on ebay. And I also ordered them each a dinosaur pillowcase from that same site and the dinosaur novelty pillows from Kohls, all of which I hope to have ready to give them for Christmas!
I love Target lamps lately. They have so many fun and colorful choices for a really low price in the Room Essentials line. I picked up the floor lamp for half off today and one of the floor rugs! I'll be sure to share when we get to work on the room! I'm excited to get started and I think they are going to love it!
Saturday, October 30, 2010
Celebrating 30!

I had an absolute blast tonight celebrating my 30th birthday (coming this Tuesday!) with my awesome family and some of the best friends ever. More to come on this costume AND this amazing cake!
Tuesday, October 26, 2010
Painted Wallpaper
An up and coming trend in home decor is definitely painted faux wallpaper. By using stencils or templates, you can get the beautiful look of wallpaper without the cost and hassle of the real stuff. It's a great way to add a subtle or bold pattern, a pop of color, or instant character to a room. When we redid our entryway, I knew I wanted it to have lots of character for being such a little room because it's the first thing people see when they walk in my house. A stenciled medallion pattern was perfect above the beadboard wainscot!
I love the visual interest in medallion patterns, stripes, and quattrefoil -- my newest endeavor! I plan on sharing the before and after tour of my kitchen one day soon. But there has been one wall in my kitchen that I have never really known what to do with. I have had all kinds of things hanging on it, from a decorative piece of fabric, a family calender, a clock, a couple shelves and cupboards, and a mirror, but nothing ever looks right because it's such a big, blank space without any cupboards.
After seeing several great posts around the Internet with a painted trellis pattern, like the ones here and here (which has a free printable template), I knew I had to find a place in my house to try it out and this troublesome wall seemed perfect.
Here's what I started with once I started taking stuff off the wall.
I printed out the template, traced it onto cardboard to make a stencil, and got to work. I mixed the leftover wall color paint with some ultra bright white paint in semi-gloss which gave it a nice sheen to offset it from the satin wall. It catches the light nicely so you can see the pattern very well without it being starkly different. (Tip: Mix the paint in a cool whip container, or another disposable container with a lid, so you can cover and store the extra or even just in between sections/coats!)
I used a pencil to trace the pattern on the wall a section at a time. I made sure the top and bottom was lined up along the trim to help it look level. The template wasn't totally symmetrical, so there were spots that I had to fudge a little, but I found this pattern to be very forgiving. I just did a single line around the pattern, instead of the double line in the posts I shared above, which saved on time, and I was still very happy with the result.

When my hubby came home, he actually thought I went out and bought wallpaper and had put it up while he was at work. Then he looked closer and was like, "You painted that?! It looks just like wallpaper! " Hahaha sweet. :)


 In the meantime I am enjoying my pretty new wall! Cost: zero! Beauty: priceless!
I used a pencil to trace the pattern on the wall a section at a time. I made sure the top and bottom was lined up along the trim to help it look level. The template wasn't totally symmetrical, so there were spots that I had to fudge a little, but I found this pattern to be very forgiving. I just did a single line around the pattern, instead of the double line in the posts I shared above, which saved on time, and I was still very happy with the result.

When my hubby came home, he actually thought I went out and bought wallpaper and had put it up while he was at work. Then he looked closer and was like, "You painted that?! It looks just like wallpaper! " Hahaha sweet. :)

Here is what my wall looks like now! I added my fun little coffee cup clock, but I'm still trying to figure out what I want to hang above the coffee bar.

 In the meantime I am enjoying my pretty new wall! Cost: zero! Beauty: priceless!
 Saturday, October 23, 2010
Santa Fe Soup
 I love making soups and stews once the cold weather hits. It is definitely a comfort food for me. Nothin' beats a hot bowl of homemade chili and a chunky slice of beer bread slathered in butter on a chilly day!
Last night I made a new kind of soup that was de-lish. I took one of my recipes from E-Mealz and adjusted it a bit and I'll definitely be making it again! Super easy and super yummy - the whole fam enjoyed it!
What you need:
* 1 lb ground beef, cooked
* 3 cans diced tomatoes
* 1 can pinto beans
* 1 can kidney beans
* 1 can whole kernel corn
* 1/2 packet taco seasoning
What you do:
Brown the ground beef in a pan and drain if needed. Add all the ingredients to a large soup pot (do not drain the cans) and heat on medium, stirring occasionally, for about 10-15 min. Simmer on low heat for about 30-35 min.
Serve with corn chips and sour cream! Enjoy!
I'm Still Here
You know, in case you were wondering. Does anyone else feel like every single moment of October is jam packed for some reason? Hope to get on here soon with a lot of updates and post ideas to share!
Subscribe to:
Posts (Atom)