
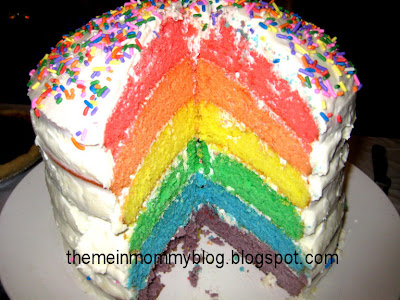
I had so much fun celebrating my 30th birthday this week with so many of my awesome family and friends. One of the highlights of the costume party (at least for me) was the rainbow cake! Plus it coordinated perfectly with my rainbow brite costume ;).

This is a cake that will definitely get some oohs and ahhs when you cut into it :). And I have had SO many people ask how to make it. Of course, you can find Martha Stewart's version here and several other great versions out there, but here are the steps I used to get the perfect 6 layer rainbow cake!

1. Take 2 white cake mixes and follow the instructions on the box to make the cake mix. (If you shop at Aldi's by the way, their cake mixes are by far the moistest mixes I have ever tried. I always use the cake mix from there because it's my favorite, and I don't even like cake that much!)


3. Pour the batter into 9" round baking pans. I had two of them, so I baked 2 layers at a time and then transferred them to cooling racks. Just be sure to grease and flour the pans well each time so the cakes don't stick! I baked them at 350 degrees F for about 14-15 min each. They will be lightly browned and a toothpick will come out clean in the center.
4. While the layers are baking, you can make the frosting (unless you're using it out of a can...). I used the following frosting recipe: Mix 2 sticks of room temp salted butter in mixer until smooth. Add 1 tsp vanilla and slowly add 4 cups of confectioner's sugar. Add 2 tsp milk. If you want it smoother, add another tsp of milk. Fold in 1 tub whipped topping (Cool Whip).
5. When all your layers have cooled, start with the purple layer and add a thin layer of frosting to the top. Stack the blue on top of the purple and continue adding a thin layer of frosting to each colored cake. After all the layers are stacked, put the cake in the freezer for an hour to set.

6. After the layers have set, remove from the freezer and ice the cake all over. I wished I had a little more frosting to go around, but I made due with what I had. If you want to "clean up" the frosting a bit, you can rinse the frosting spreader in hot water and smooth it out. I added rainbow sprinkles to the top, but you could also leave it white, or add a rainbow of skittles and marshmallows for a cloud on top! Put the cake back in the freezer for another hour.


7. Take the cake out of the freezer and store in the fridge until ready to serve!


It is such a happy cake! Happy to make, happy to look at, and happy to eat! You could totally have fun with the colored layers for different occasions too! Enjoy!

2 comments:
Thanks for sharing this! My friend was telling me, a long time ago, that she wanted to make a cake like this for her daughter's birthday coming up next month (the theme is RAINBOW) :) I will have show her this! You are so talented (and pretty) <3
Melissa I have a cake tip for you... if you bake your cakes at 275 degrees and of course it takes longer, but then the cakes will not crown and they retain a super moist texture. this makes it easier for stacking. Your cake was super cute BTW and looked very yummy!
Post a Comment